

#kuyaeffect guide to momentum runners:
Part 1: SETUP
I use a KISS (keep it simple, stupid) method… you do not need much.
- 21EMA: main trend, 1st line of trend dip adds
- 50EMA: secondary trend, 2nd line of trend dip adds
- 200EMA: absolute bottom trend support levels
Part 1: SETUP
I use a KISS (keep it simple, stupid) method… you do not need much.
- 21EMA: main trend, 1st line of trend dip adds
- 50EMA: secondary trend, 2nd line of trend dip adds
- 200EMA: absolute bottom trend support levels
Part 2: MOMENTUM
In order to have intra/multi-day potential, there MUST be the following:
- news
- catalyst (run up in anticipation)
- unusual relative volume
In order to have intra/multi-day potential, there MUST be the following:
- news
- catalyst (run up in anticipation)
- unusual relative volume
Part 3: VOLUME
Liquidity is needed in order to suffice price action movement. Ideally >50-100x avg volume (ex: 100+ mil)
Volume criteria (per 1 minute candle):
- low: less than 100k
- med: 100-250k
- high: 250k-500k
- very high: 500k-750k
- ideal: greater than 1 million
Liquidity is needed in order to suffice price action movement. Ideally >50-100x avg volume (ex: 100+ mil)
Volume criteria (per 1 minute candle):
- low: less than 100k
- med: 100-250k
- high: 250k-500k
- very high: 500k-750k
- ideal: greater than 1 million
Part 4: SUPPORT/RESISTANCE
Go to the daily and weekly charts to plot levels and find areas of support and resistance. You will use these levels to determine key breakouts and flush (supply) zones.
Go to the daily and weekly charts to plot levels and find areas of support and resistance. You will use these levels to determine key breakouts and flush (supply) zones.
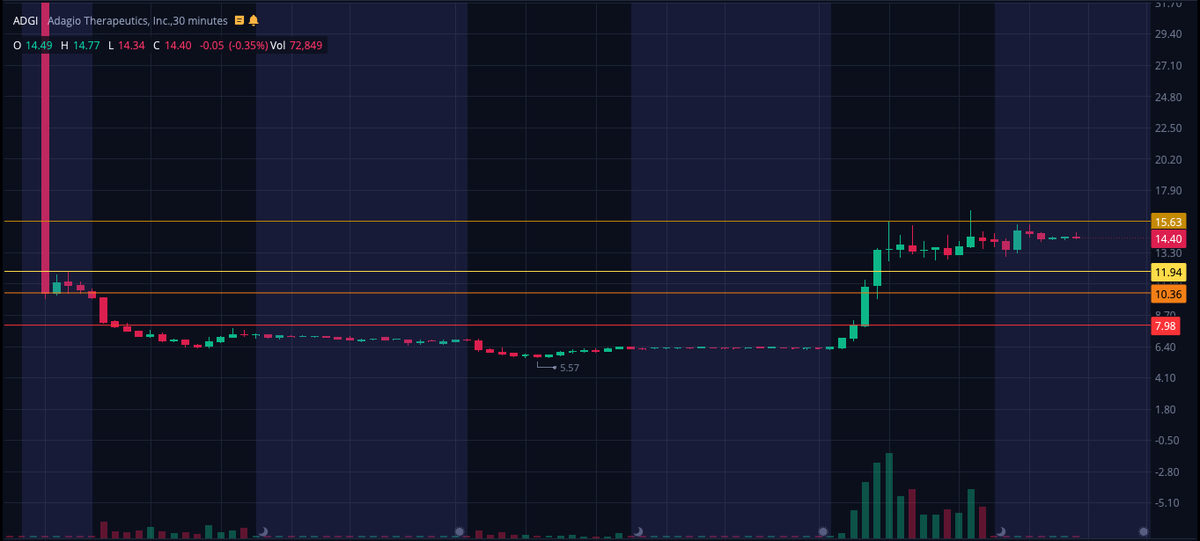
Part 4: SUPPORT/RESISTANCE (cont)
I have color coded each key level on $ADGI today where you identify breakouts and pullback zones.
Since this was a “gap” down play, I used a smaller time frame (30m, 1h, 4h are good choices)
I have color coded each key level on $ADGI today where you identify breakouts and pullback zones.
Since this was a “gap” down play, I used a smaller time frame (30m, 1h, 4h are good choices)
Part 5: IDENTIFYING THE TREND
21EMA is my main trend line, you must cycle the time frames to identify where the trend lies.
Scalpers: 2m, 5m
Intraday: 5m, 10m
Swings: 30m, 1h
Example: $SEAC hourly trend shows strong 21EMA trend dips and 50EMA trend "load" zone dips
21EMA is my main trend line, you must cycle the time frames to identify where the trend lies.
Scalpers: 2m, 5m
Intraday: 5m, 10m
Swings: 30m, 1h
Example: $SEAC hourly trend shows strong 21EMA trend dips and 50EMA trend "load" zone dips

Part 5: IDENTIFYING THE TREND (cont)
Trend confirmation can be identified by bullish candlestick setups:
- hammers, dojis
- candles with strong wicks at trend levels signifying buyers support
One advanced strategy is utilizing level 2 for bid support at trend levels
Trend confirmation can be identified by bullish candlestick setups:
- hammers, dojis
- candles with strong wicks at trend levels signifying buyers support
One advanced strategy is utilizing level 2 for bid support at trend levels
Part 6: SCALING INTO A TRADE
Once we have identified the time frame trend levels, begin to scale in at those levels. After the trend has “confirmed”, begin to set limit buys for adding dips.
Once we have identified the time frame trend levels, begin to scale in at those levels. After the trend has “confirmed”, begin to set limit buys for adding dips.
Part 6: SCALING INTO A TRADE (cont)
On strong volume (part 3) where we have high --> ideal levels, you can slowly accumulate your position so long as the trend holds.
- 21EMA is where I will build a position
- 50EMA is where I will add with more size upon confirmation
On strong volume (part 3) where we have high --> ideal levels, you can slowly accumulate your position so long as the trend holds.
- 21EMA is where I will build a position
- 50EMA is where I will add with more size upon confirmation
Part 7: SCALING OUT OF A TRADE
Using resistance levels from part 4, begin scaling out on major price pops OR when resistance levels are rejected (upper candlestick wicks).
Given the trend timeframe, when a candle closes below and breaks trend…. you close that position.
Using resistance levels from part 4, begin scaling out on major price pops OR when resistance levels are rejected (upper candlestick wicks).
Given the trend timeframe, when a candle closes below and breaks trend…. you close that position.
Part 8: CONTROLLING FOMO
You did the technical analysis.
You plotted the supply/demand levels.
Leave a LOTTO size in case of the parabolic move 🙂
You did the technical analysis.
You plotted the supply/demand levels.
Leave a LOTTO size in case of the parabolic move 🙂
Loading suggestions...