

Tutorial thread time! 🧵
Learn how to create animations like this with @figma in a few easy steps.
Figma file available at the end of the thread 👀
Let’s dive in👇
Learn how to create animations like this with @figma in a few easy steps.
Figma file available at the end of the thread 👀
Let’s dive in👇

There are two distincts animations but they share the same process.
1️⃣ The pulse effect 🫀
2️⃣ The "squiggly snakes" 🐍
1️⃣ The pulse effect 🫀
2️⃣ The "squiggly snakes" 🐍

For both animations I'm using the interactive components feature from @figma.
Don't know what it is? Check this out:
👉 help.figma.com
Don't know what it is? Check this out:
👉 help.figma.com
Basically the animation process is:
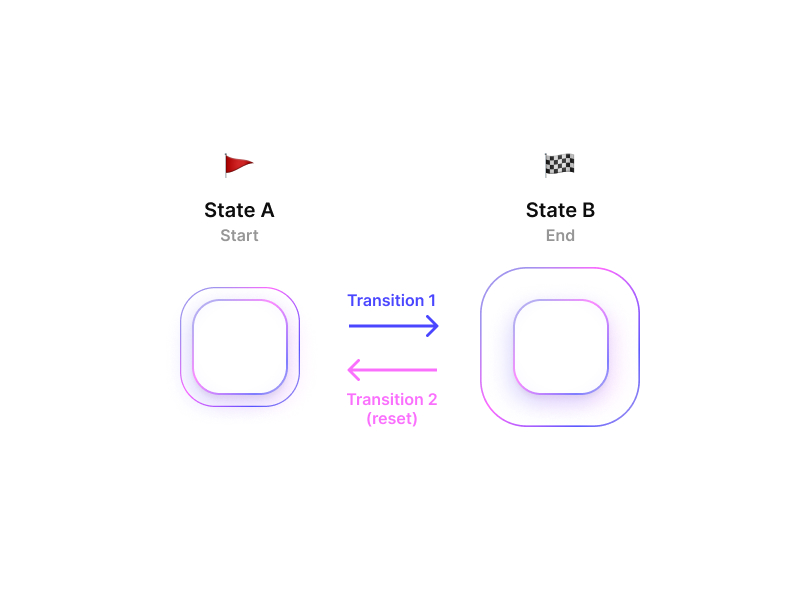
1️⃣ Create a state A that we'll use as the start of the animation
2️⃣ Make it a component
3️⃣ Create a variant state B for the animation ending
4️⃣ Use the prototyping tool to adjust timings and delays to go from state A to B and vice versa
1️⃣ Create a state A that we'll use as the start of the animation
2️⃣ Make it a component
3️⃣ Create a variant state B for the animation ending
4️⃣ Use the prototyping tool to adjust timings and delays to go from state A to B and vice versa
Let's start with the pulse effect 🫀
1️⃣ Create a shape for state A
2️⃣ Duplicate state A and resize it to create state B
3️⃣ Outline strokes (radius transformation aren't handled yet)
4️⃣ Create a component for both states
5️⃣ Combine components as variants
1️⃣ Create a shape for state A
2️⃣ Duplicate state A and resize it to create state B
3️⃣ Outline strokes (radius transformation aren't handled yet)
4️⃣ Create a component for both states
5️⃣ Combine components as variants

Now the fun part!
It's time to animate the transitions from one state to the other.
Let's go to the prototype panel and make some magic happen ✨
NB: Remember to hit the ▶ button in Figma (top right) to preview your work 👀
It's time to animate the transitions from one state to the other.
Let's go to the prototype panel and make some magic happen ✨
NB: Remember to hit the ▶ button in Figma (top right) to preview your work 👀

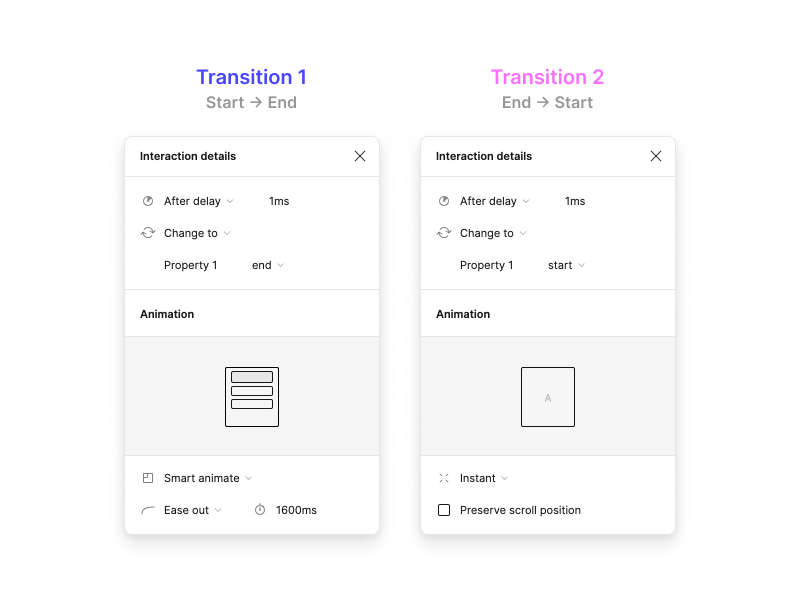
Here are the settings used for both transitions 🔍
A bit more explanations 📚 [1/2]
After delay → we use it to make the animation play endlessly without having to trigger it every time by our own.
Smart animate → @figma's magic that will create a smooth transition between the two states.
After delay → we use it to make the animation play endlessly without having to trigger it every time by our own.
Smart animate → @figma's magic that will create a smooth transition between the two states.
A bit more explanations 📚 [2/2]
We must create a transition from state B back to state A otherwise your animation can't loop.
It's what I called the "reset" 🔁
We must create a transition from state B back to state A otherwise your animation can't loop.
It's what I called the "reset" 🔁
Let's bring a bit of color 🎨
1️⃣ Add a gradient to both shapes
2️⃣ Set the opacity of the shape from ending state to 0 to create that fade out effect and avoid the brutal transition back to state A
You should have something like this 👇
1️⃣ Add a gradient to both shapes
2️⃣ Set the opacity of the shape from ending state to 0 to create that fade out effect and avoid the brutal transition back to state A
You should have something like this 👇

Let's customize the final animation 🎛
1️⃣ Duplicate the component to keep its properties
2️⃣ Add some delay to the new component so that both pulses don't trigger at the same time
3️⃣ Add some delay to the reset transition from the first component so that pulses stay in sync
1️⃣ Duplicate the component to keep its properties
2️⃣ Add some delay to the new component so that both pulses don't trigger at the same time
3️⃣ Add some delay to the reset transition from the first component so that pulses stay in sync

And voilà, you just made the pulse effect 👏🍾
Now let's make the "squiggly snakes" 🐍👇
Now let's make the "squiggly snakes" 🐍👇

Let's create our snake shape:
1️⃣ Create a line
2️⃣ Apply a gradient
3️⃣ Add some layer blur
4️⃣ Duplicate the line multiple times and set various layer blurs to get the neon effect we're looking for 🌈
5️⃣ Create a shape that we'll use as a mask and put it on the left of your lines
1️⃣ Create a line
2️⃣ Apply a gradient
3️⃣ Add some layer blur
4️⃣ Duplicate the line multiple times and set various layer blurs to get the neon effect we're looking for 🌈
5️⃣ Create a shape that we'll use as a mask and put it on the left of your lines

Now we repeat the steps we did for the pulse animation 🔁
1️⃣ Duplicate the starting state and move the mask to the right of the lines to create the final state
2️⃣ Turn both frames into components
3️⃣ Combine components as variants
1️⃣ Duplicate the starting state and move the mask to the right of the lines to create the final state
2️⃣ Turn both frames into components
3️⃣ Combine components as variants

Then, it's the same as for the pulse animation
1️⃣ Create the transition between the starting and ending states
2️⃣ Create the reset transition to make the animation loop endlessly
1️⃣ Create the transition between the starting and ending states
2️⃣ Create the reset transition to make the animation loop endlessly

Here's 2 versions of the same animation so you can understand how it works 👇

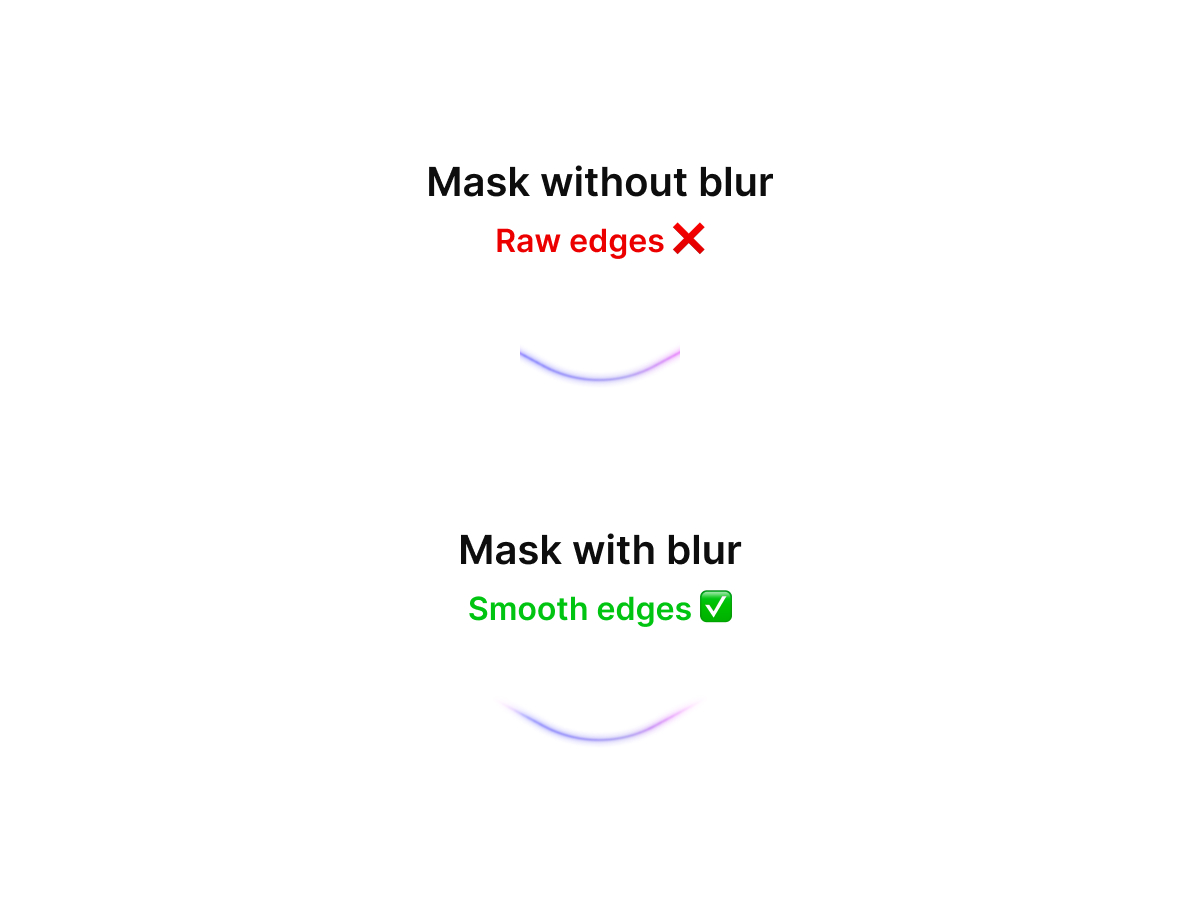
Little big detail 👀
👉 We add a "layer blur" effect to the mask to smooth the edges of the shape
👉 We add a "layer blur" effect to the mask to smooth the edges of the shape
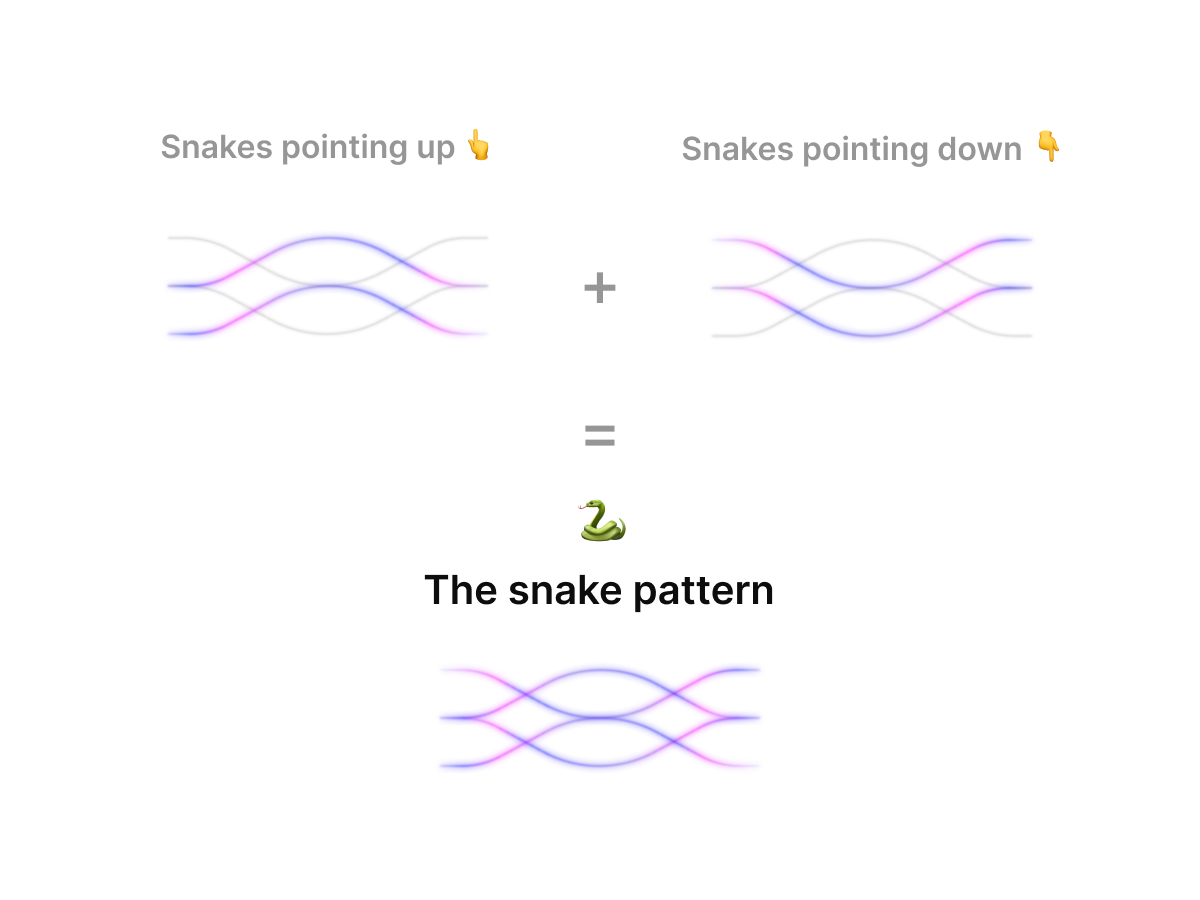
Now let's create the pattern that leads to the final result.
1️⃣ Duplicate your snake component until you have 4
2️⃣ Apply a 180° rotation to the lines in 2 of them
Here's how I've organized them in my file 👇
1️⃣ Duplicate your snake component until you have 4
2️⃣ Apply a 180° rotation to the lines in 2 of them
Here's how I've organized them in my file 👇
Now let's polish the masterpiece 💎
1️⃣ Turn the grey shape in each component into a mask if it's not already done
2️⃣ Change the duration for each snake animation to make them move at different speed
1️⃣ Turn the grey shape in each component into a mask if it's not already done
2️⃣ Change the duration for each snake animation to make them move at different speed

Congrats you just made the "squiggly snakes" animation 🐍 🙌

Loading suggestions...