

pushd and popd are very underutilized commands, yet incredibly powerful.
These cmds give you the ability to manage your directory stack and easily switch between directories, making them a must-have tool for any Linux user looking to maximize their efficiency and productivity
These cmds give you the ability to manage your directory stack and easily switch between directories, making them a must-have tool for any Linux user looking to maximize their efficiency and productivity

In this thread, I'll show you how to use the pushd and popd commands to unlock the power of easy system directory navigation and streamline your workflow.
First let's understand what a Directory Stack is?
The Directory Stack is an ordered list of directories that have been accessed during navigation.
The contents of the Directory Stack can be viewed through the execution of the dirs command.
The Directory Stack is an ordered list of directories that have been accessed during navigation.
The contents of the Directory Stack can be viewed through the execution of the dirs command.
The addition of directories to the stack occurs upon transitioning to a new directory using the pushd command, while removal of directories is accomplished via the popd command.
The directory stack always starts with the current working directory at the top (you have probably noticed it when you executed the dirs command).
The directory in which the user is currently working is referred to as the current working directory.
The directory in which the user is currently working is referred to as the current working directory.
Every time you use the command line, you are working in a directory.
You can use the pwd command to find out your current working directory. Also in most Linux distributions, the terminal prompt has been altered to display the current working directory as a default feature.
You can use the pwd command to find out your current working directory. Also in most Linux distributions, the terminal prompt has been altered to display the current working directory as a default feature.
The pushd, popd, and dirs commands are shell built-ins and their behavior may vary slightly across different shell implementations. This discussion will focus on the behavior of these commands as shell built-ins in the Bash shell.
With all that out of the way, let's now tallk about the usage of these commands:
𝗽𝘂𝘀𝗵𝗱 𝗰𝗼𝗺𝗺𝗮𝗻𝗱 𝘂𝘀𝗮𝗴𝗲 𝗮𝗻𝗱 𝘀𝘆𝗻𝘁𝗮𝘅
The syntax of the pushd command is very simple and easy to understand:
$ pushd [OPTIONS] [DIRECTORY]
𝗽𝘂𝘀𝗵𝗱 𝗰𝗼𝗺𝗺𝗮𝗻𝗱 𝘂𝘀𝗮𝗴𝗲 𝗮𝗻𝗱 𝘀𝘆𝗻𝘁𝗮𝘅
The syntax of the pushd command is very simple and easy to understand:
$ pushd [OPTIONS] [DIRECTORY]
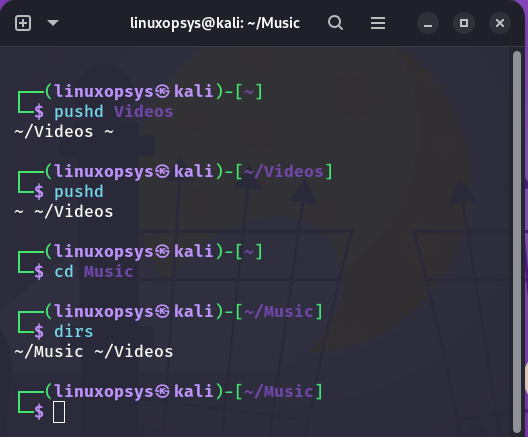
With no arguments, pushd exchanges the top two elements of the directory stack.
Here's an example of switching to the /Documents directory while also moving it to the top of the directory stack:
$ pushd Documents
Here's an example of switching to the /Documents directory while also moving it to the top of the directory stack:
$ pushd Documents

Notice upon successful execution, the pushd command prints the directory stack with the ~/Documents and ~ as the contents of the stack.
The ~ (tilde) is the directory where we ran the pushd command. In Linux the tilde character represents the home directory.
The ~ (tilde) is the directory where we ran the pushd command. In Linux the tilde character represents the home directory.
The pushd command operates by first saving the current working directory to the top of the directory stack, and then changing to the specified directory.
As the current working directory must always reside at the top of the stack, a change in the current directory results in the new directory being placed at the top of the stack.
However, this change is not saved to the stack until pushd is invoked from the new current directory. If the cd command is used to change to a different directory, the top item in the directory stack will be lost.

Notice the ~/Documents directory, was discarded from the directory stack after we changed to another directory using the cd command.
Here is an example of saving changes to the directory stack:
$ pushd Documents
$ pushd
Here is an example of saving changes to the directory stack:
$ pushd Documents
$ pushd
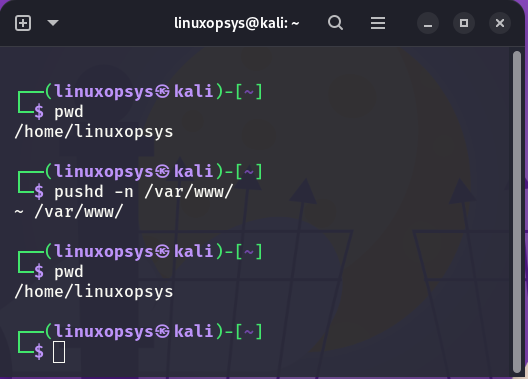
As previously demonstrated, the pushd command automatically changes to the directory specified as an argument. To avoid this behavior, the -n option can be used in conjunction with the desired directory to add it to the directory stack without switching to it.
The pushd command offers two options, +N and -N, which enable navigation to the Nth directory in the directory stack. The +N option changes to the Nth element in the stack, counting from left to right, starting with zero. The -N option counts from right to left.
To clarify the behavior of these options, the following is an example of printing the current directory stack:
$ dirs -l -v
$ dirs -l -v
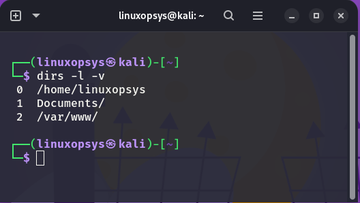
The -v option causes dirs to print the directory stack with one entry per line, prefixing each entry with its index in the stack.
The -l option allows dirs to produce a listing using full pathnames; the default listing format uses a tilde to denote the home directory.
The -l option allows dirs to produce a listing using full pathnames; the default listing format uses a tilde to denote the home directory.
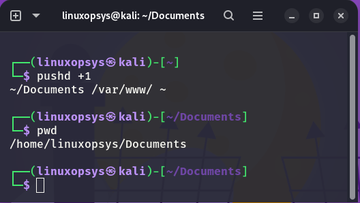
To change to the Documents directory and move it to the top of the directory stack, either of the following options can be used:
When counting from top to bottom (or left to right), the index of the Documents directory is 1.
When counting from top to bottom (or left to right), the index of the Documents directory is 1.
In this case, the following command can be used:
$ pushd +1
$ pushd +1
When counting from bottom to top, the index of the Documents/ directory is 1. The following command can be used in this case:
$ pushd -1
$ pushd -1
𝗽𝗼𝗽𝗱 𝗰𝗼𝗺𝗺𝗮𝗻𝗱 𝘂𝘀𝗮𝗴𝗲 𝗮𝗻𝗱 𝘀𝘆𝗻𝘁𝗮𝘅
The syntax for the popd command is as follows:
$ popd [OPTIONS]
When invoked without any arguments, popd removes the top directory from the directory stack and changes to the new top directory.
The syntax for the popd command is as follows:
$ popd [OPTIONS]
When invoked without any arguments, popd removes the top directory from the directory stack and changes to the new top directory.
For example, consider the following directory stack:
$ dirs
$ dirs

Running the popd command will remove the ~/Documents from the stack and change to the /opt/ directory:
$ popd
$ dirs
$ popd
$ dirs
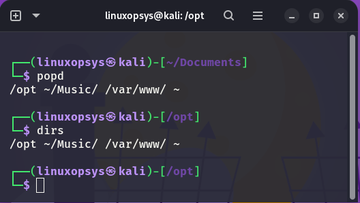
As you have seen the output of the popd command will display the updated directory stack:
If you want to suppresses the default directory change and removes the second item from the stack use the -n option:
$ popd -n
If you want to suppresses the default directory change and removes the second item from the stack use the -n option:
$ popd -n

Like the pushd command, popd also accepts the +N and -N options, which can be used to remove the Nth directory in the stack.
𝗦𝘂𝗺𝗺𝗶𝗻𝗴 𝘂𝗽
The pushd, popd and dirs commands, like most Linux commands, they have a plethora of additional options. For more information, consult this man page for directory stack builtins:
gnu.org
The pushd, popd and dirs commands, like most Linux commands, they have a plethora of additional options. For more information, consult this man page for directory stack builtins:
gnu.org
I believe the examples I have provided are sufficient to provide you with a thorough understanding of these fantastic commands.
Thank you for making it this far.
Thank you for making it this far.
If you found this thread valuable:
1. Toss us a follow for more daily threads on Linux, sysadmin and security → @linuxopsys
2. Like and RT the first tweet so other Linux folks can find it too.
1. Toss us a follow for more daily threads on Linux, sysadmin and security → @linuxopsys
2. Like and RT the first tweet so other Linux folks can find it too.
Loading suggestions...