

Drawing Supply and Demand Zones
Best And Simplest Methods For Drawing And Trading Supply And Demand Zones.
A Must 🧵
Best And Simplest Methods For Drawing And Trading Supply And Demand Zones.
A Must 🧵
First and foremost,
Rally-base-drop or drop-base-drop supply zones exist. You can draw it using one of the three methods described below.
Rally-base-drop or drop-base-drop supply zones exist. You can draw it using one of the three methods described below.
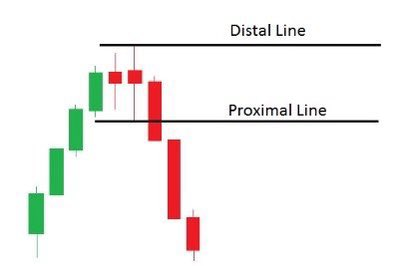
The Conservative Approach
The distal line (first line) should be placed at the top of the wick, and the proximal line (second line) should be placed at the base's lowest body.
The distal line (first line) should be placed at the top of the wick, and the proximal line (second line) should be placed at the base's lowest body.

The High-Risk Approach
Place the distal line at the highest wick and the proximal line at the lowest wick in the base structure.
Place the distal line at the highest wick and the proximal line at the lowest wick in the base structure.
The Low-Risk Method
In the base structure, place the distal line at the highest wick and the proximal line at the highest body.
In the base structure, place the distal line at the highest wick and the proximal line at the highest body.

What You Should Know
Demand zones, on the other hand, are either drop-base-rally or rally-base-rally. The demand zone, like the supply zone, can be drawn in three different ways, as shown below.
Demand zones, on the other hand, are either drop-base-rally or rally-base-rally. The demand zone, like the supply zone, can be drawn in three different ways, as shown below.
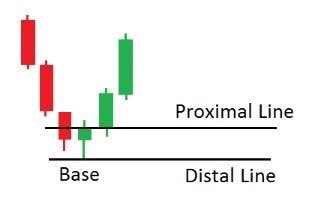
The Conservative Approach
The distal line should be placed at the lowest wick in the base structure, and the proximal line should be placed at the highest body.
The distal line should be placed at the lowest wick in the base structure, and the proximal line should be placed at the highest body.
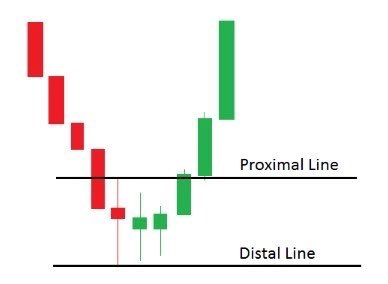
The High-Risk Method
In the base structure, place the distal line at the lowest wick and the proximal line at the highest wick.
In the base structure, place the distal line at the lowest wick and the proximal line at the highest wick.
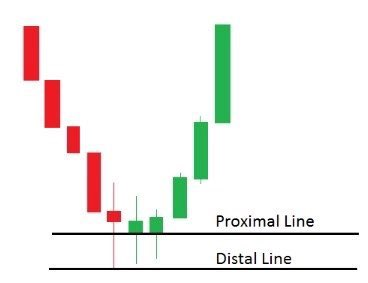
The Low-Risk Method
In the base structure, place the distal line at the lowest wick and the proximal line at the lowest body.
In the base structure, place the distal line at the lowest wick and the proximal line at the lowest body.
The Low-Risk Method
In the base structure, place the distal line at the lowest wick and the proximal line at the lowest body.
In the base structure, place the distal line at the lowest wick and the proximal line at the lowest body.
This is best used on the 1 day, 1 week and timeframes to find the big supply and demand zones.
You can also use this on the 15 minutes for more intraday zones.
You can also use this on the 15 minutes for more intraday zones.
If you found this thread worth and useful then do spread word about it and help us educate beginner and fellow traders in the market.
Happy Reading!
Happy Reading!
Loading suggestions...