

DSU Sideloader- Dual-booting for Android!
As per most people's request, this is a guide on how to flash your favorite GSI to your phone/tablet with no data loss. Do note that this will only work for users with an unlockable bootloader and I can only explain how to do it on a Samsung device.
Also, please do not spam me with DM’s if anything wrong happens with your device. Do note that you will void warranty too because Knox gets tripped. This guide is recommended for advanced users ONLY, or those who read properly.
You don’t necessarily have to root it, which I will not cover. To be honest, I got help from a XDA user with rooting, Not confident enough to explain it as of now, so I will not risk it trying to make a guide for rooting.
Prerequisites-
1) Android 10 or higher
2)Unlocked bootloader
3) Device with Dynamic Partitions
4)Any GSI you want to use. I personally recommend you using Ponces Treble ASOP GSI for the best results.
[A thread🧵]
Unlock your bootloader
DO NOTE THAT DATA WILL BE WIPED, SO MAKE SURE TO TAKE A BACKUP!
Prerequisites-
-->Laptop/PC
-->USB-C Cable
To do so, carefully follow these steps.
1) Power off your device.
2) Enter download mode by holding down both the volume keys. Do not let it it go and connect it to your PC
3) You will see a blue screen named Download Mode
4) For first time users who never unlocked their bootloader first, it will show as “Device Unlock Mode”, long press volume up button to unlock.
5) You will get into another screen saying Unlock Bootloader
6) Press the volume up button again. You will get a pop-up saying “This phone’s bootloader is unlocked”
7) Your data would be wiped.
8) Re-setup your device to your liking,
Now, as mentioned before, some might root it to take advantage of the bootloader unlock, which I did, but I took a lot of help from a XDA user who guided me through the rooting process and made me a kernel to work with KernelSU. I will not be guiding you through the rooting process in this post. It will be a seperate post if I am confident enough.

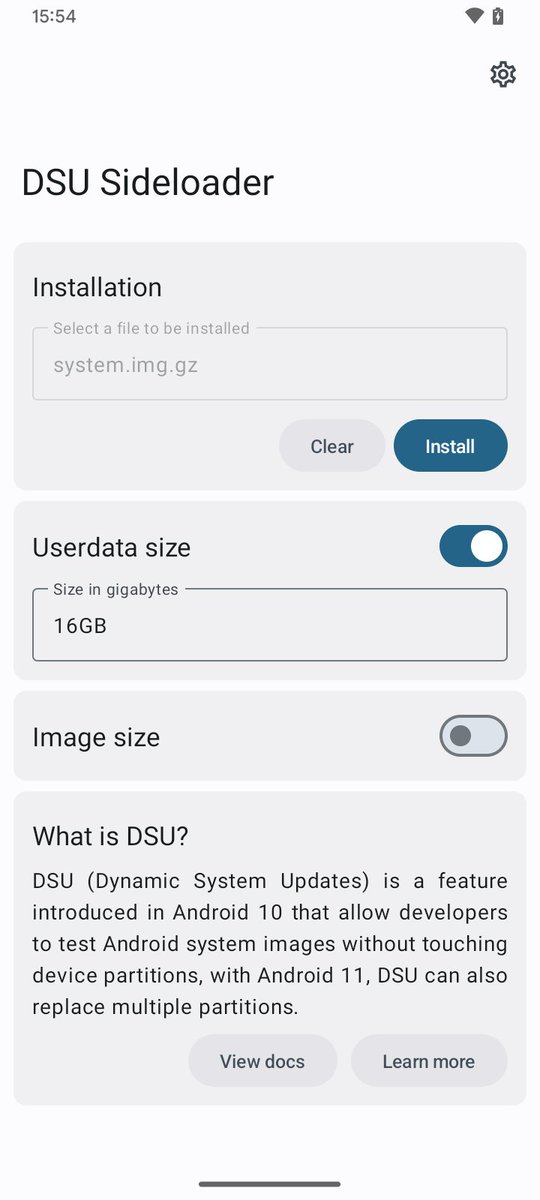
Setup and Installation
If you by chance are already rooted, you can flash the .zip file. I used the module_DSU_Sideloader.zip and I’m not sure what the other one, module_DSU_Sideloader-gsid.zip does.
Here are the steps-
1) Install the APK from github.com
2) Follow the steps. It will be self explanatory and will guide you through!
3) Install a GSI you like and customize the userdata size for the partition the way you like, I chose 32GB for the GSI. I do not recommend you to change the GSI file size though as the app automatically determines what is suitable.
4) If running on non rooted devices, you have two options.
→ADB commands via computer
→Shizuku(multiple guides are present upon how to setup Shizuku, so I won’t cover it here.
5) The app will request user for starting installation. Grant that.
6) Wait for it to install. It is going to take a while to install and please do not exit the app or close it in the background because the installation would get interrupted and you will have to start over again.
7) After it finishes, if you are using ADB, it will prompt a command to again confirm installation.
8) You will get a notification to restart your device into the GSI.
Recovery
Are you a type of person who is wanting to explore and ready to soft brick their devices? Well do not worry, its very simple to disable the GSI to get back into OneUI!
Signs of GSI not working-
1) Taking long time to boot into the OS
2) Black screens(not usual)
3) Refusing to install/work
To recover and boot back to stock OS, simply just hold power button and volume down.

Enable Persistent boot to GSI(optional)
This is useful if you want to always boot your device into the GSI you have flashed.
1)If you are running with ADB use-
adb shell gsi_tool enable
If you are using my guide, follow this if you want.
2)Running local ADB shell-
gsi_tool enable
3)Local rooted shell-
su -c 'gsi_tool enable'
To disable this, use the same command and replace enable with disable

Recommendations
Personally, I found the Ponces Treble ASOP reliable. I used this-
github.com
This is the version with Google Apps installed(GApps). You could scour through this GitHub releases and flash whatever you feel like. Also, please do try the other GSI’s if you wish and comment down below. I will make a list of all the functional GSI’s in a spreadsheet and share it later if a lot of people try it or I mess around with it!

Sources
Incase you did not understand my guide or want to know more about this process, refer to these links-
DSU-Sideloader app- github.com
Ponces Treble ASOP GSI- github.com
Community GSI’s- github.com
Google GSI’s- developer.android.com
Incase you did not understand my guide or want to know more about this process, refer to these links-
DSU-Sideloader app- github.com
Ponces Treble ASOP GSI- github.com
Community GSI’s- github.com
Google GSI’s- developer.android.com
Final thoughts
This is a great way to remove an OS you do not like. However, some of the GSI’s are buggy, won’t boot or some of the features will be missing. This is also recommended for those who do not have warranty or are determined that their device won’t have any issues later on. This is only recommended if you do it with a cool mind, take lots of time to read properly and understand. A lot of things can go wrong if you don’t read properly.
Once again saying, THIS WILL TRIP KNOX AND VOID YOUR WARRANTY, DO IT AT YOUR OWN RISK.

For more informative guides, shitposts, reviews and so on, please consider following my Twitter handle-
Consider reposting this post if you found it helpful-
x.com
Again, thanks for reading and hope you enjoy your shiny new OS 😏
x.com
Again, thanks for reading and hope you enjoy your shiny new OS 😏
Loading suggestions...